Ubuntu18禁用root用户
· 3 min read
Ubuntu18禁用root用户,ARM架构安装的Ubuntu18.04+Xfac系统,默认登录用户是root,在文件窗口提示:
Warning, you are using the root account, you may harm your system.
大概意思是,不要用root登录,可能损坏你的系统。Disabling root user warnings?
解决方案
既然不建议用root用户登录,那就新建一个其他有root权限的用户。
首先使用root用户来登录远程主机
ssh root@主机ip(或主机域名)
分几个步骤:
1、创建用户ubuntu
root@Yztiot:~# adduser ubuntu
Adding user `ubuntu' ...
Adding new group `ubuntu' (1001) ...
Adding new user `ubuntu' (1001) with group `ubuntu' ...
Creating home directory `/home/ubuntu' ...
Copying files from `/etc/skel' ...
Enter new UNIX password:
Retype new UNIX password:
passwd: password updated successfully
Changing the user information for ubuntu
Enter the new value, or press ENTER for the default
        Full Name []:
        Room Number []:
        Work Phone []:
        Home Phone []:
        Other []:
Is the information correct? [Y/n] y
root@Yztiot:~#
2、赋予userName用户root权限
root@Yztiot:~# vi /etc/sudoers
在文件中找到这一行:root ALL=(ALL:ALL) ALL 复制并粘贴到一新行,修改用户名称为ubuntu
/etc/sudoers
root    ALL=(ALL:ALL) ALL
Yztiot    ALL=(ALL:ALL) ALL
ubuntu  ALL=(ALL:ALL) ALL
3、修改桌面管理器 xfce 用户自动登录
root@Yztiot:~# vi /etc/lightdm/lightdm.conf
/etc/lightdm/lightdm.conf
[Seat:*]
autologin-guest=false
autologin-user=ubuntu # 这里修改成默认登录用户名
aotologin-password=123456
autologin-session=lightdm-autologin
4、禁用root登录
root@Yztiot:~# vi /etc/ssh/sshd_config
/etc/ssh/sshd_config
/PermitRootLogin  # 输入/PermitRootLogin搜索,按n可以搜索下一处向下搜索,把PermitRootLogin yes修改为PermitRootLogin no

# and ChallengeResponseAuthentication to 'no'.
UsePAM yes

PermitRootLogin no
PermitEmptyPasswords yes
#AllowAgentForwarding yes
5、重启计算机
root@Yztiot:~# reboot
重新测试使用 ssh@root 登录,显示已�失效。Xfce窗口桌面,显示已经是ubuntu了,不再有开始的警告了。
login as: root
Access denied
6、自动登录异常
注意
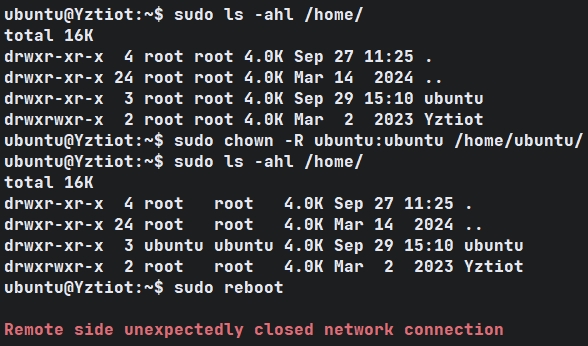
注意创建ubuntu用户后的/home/ubuntu目录权限,它应该归你创建的用户(ubuntu)所有,如果没有:
Xface自动登录不起作用,SSH远程虽可登录,但报错卡顿,提示:/usr/bin/xauth: timeout in locking authority file /home/ubuntu/.Xauthority

解决方案
运行
$ sudo chown -R ubuntu:ubuntu /home/ubuntu/
$ sudo chmod 755 /home/ubuntu/

再次ssh登录到book用户,报错消失,也不会卡顿,Xface自动登录正常。
声明:本文素材来源网络,版权归原作者所有。如涉及作品版权问题,请与我联系删除。